如何使用 Electron 快速开发一个 WebP 图片批量转换器
图像优化直接影响网页加载速度和带宽消耗,进而影响网站的访问速度和运行成本。通过优化图像,可以降低加载时间、减少用户等待。相比传统的 JPEG 和 PNG,WebP 格式压缩效率更高、文件体积更小。本文将介绍如何使用 Electron 构建一个跨平台的 WebP 图像批量转换工具,这个工具可以帮助我们轻松地将 JPG 和 PNG 图像转换为 WebP,从而加快图像加载。
项目概述
webp-converter 项目是一个基于 Electron 的桌面应用程序,全程与 Cursor 对话完成开发,提供批量将 JPG 和 PNG 图像转换为 WebP 格式的功能。主要特点包括:
- 支持批量转换 JPG 和 PNG 图像
- 可自定义输入和输出目录
- 实时显示转换进度
- 跨平台支持(Windows、macOS、Linux)
这个工具能让我们通过简单的桌面应用批量转换图像,而不需要使用复杂的命令行工具。它通过 Electron 构建跨平台桌面应用,利用 Sharp 进行图像格式转换,并借助 TailwindCSS 实现用户界面设计。
核心功能实现
1. 主进程设置
主进程负责创建窗口以及处理用户与系统之间的交互逻辑。以下是一个简化的窗口创建逻辑:
1
2
3
4
5
6
7
8
9
10
11
12
13
14
15
function createWindow() {
  const win = new BrowserWindow({
    width: 800,
    height: 600,
    webPreferences: {
      nodeIntegration: false,
      contextIsolation: true,
      preload: path.join(__dirname, 'preload.js'),
    }
  });

  win.setMenu(null);  // 移除菜单栏

  win.loadFile('index.html');
}
这个窗口是应用的基础框架,设置了网页预加载脚本用于与渲染进程进行安全通信。
2. 图像转换逻辑
图像转换的核心逻辑通过 Sharp 库来实现。Sharp 可以根据输入图像的格式,选择不同的压缩策略来生成 WebP 格式的图像。
1
2
3
4
5
6
7
8
9
10
11
12
13
14
15
16
17
18
19
20
21
22
23
24
25
26
27
28
29
30
31
32
33
34
35
36
37
38
39
40
41
ipcMain.on('convert-images', async (event, { inputDir, outputDir }) => {
  try {
    const actualOutputDir = outputDir || inputDir;

    if (!fs.existsSync(actualOutputDir)) {
      fs.mkdirSync(actualOutputDir, { recursive: true });
    }

    const files = await fs.promises.readdir(inputDir);

    const imageFiles = files.filter(file => {
      const ext = path.extname(file).toLowerCase();
      return ext === '.jpg' || ext === '.jpeg' || ext === '.png';
    });

    let convertedCount = 0;

    for (const file of imageFiles) {
      const inputFilePath = path.join(inputDir, file);
      const outputFileName = path.basename(file, path.extname(file)) + '.webp';
      const outputFilePath = path.join(actualOutputDir, outputFileName);

      if (path.extname(file).toLowerCase() === '.png') {
        await sharp(inputFilePath).webp({ lossless: true }).toFile(outputFilePath);
      } else {
        await sharp(inputFilePath).webp({ quality: 80 }).toFile(outputFilePath);
      }

      convertedCount++;
      event.reply('conversion-progress', {
        current: convertedCount,
        total: imageFiles.length
      });
    }

    event.reply('conversion-complete', '图像转换完成');
  } catch (err) {
    console.error('转换过程中出错:', err);
    event.reply('conversion-error', err.message);
  }
});
这个逻辑对每个符合条件的图像文件进行逐一转换,并使用异步操作来保证性能不会受到大文件或大量文件的影响。
3. 用户界面实现
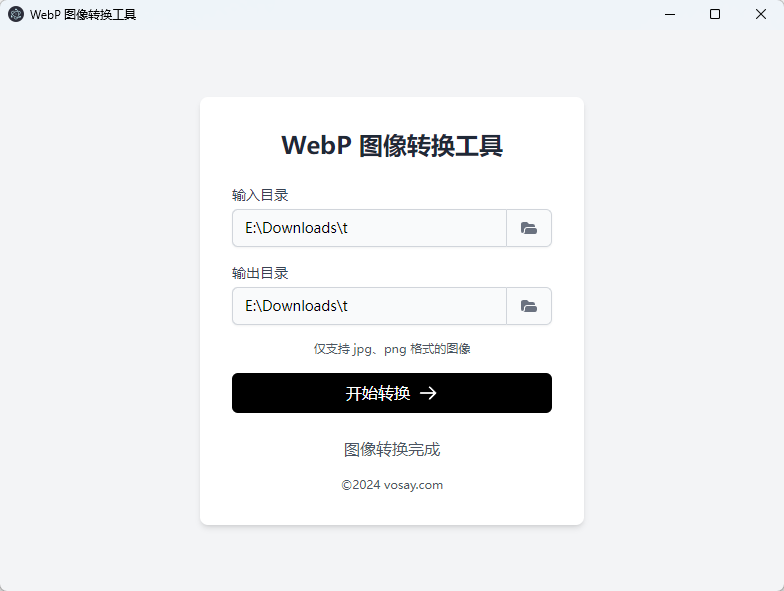
我使用 TailwindCSS 来构建用户界面,包含输入和输出路径选择、转换按钮、以及转换进度的显示。
1
2
3
4
5
6
7
8
9
10
11
12
13
14
15
16
17
18
19
20
21
22
23
24
25
26
27
<body class="bg-gray-100 h-screen flex items-center justify-center">
    <div class="bg-white p-8 rounded-lg shadow-md w-96">
        <h1 class="text-2xl font-bold mb-6 text-center text-gray-800">WebP 图像转换工具</h1>
        <div class="space-y-4">
            <div>
                <label for="inputDir" class="block text-sm font-medium text-gray-700 mb-1">输入目录</label>
                <div class="mt-1 flex rounded-md shadow-sm">
                    <input type="text" id="inputDirPath" readonly class="flex-1 min-w-0 block w-full px-3 py-2 text-sm border border-gray-300 bg-gray-50" placeholder="选择输入目录">
                    <button id="inputDir" class="inline-flex items-center px-3 py-2 border border-l-0 bg-gray-50 text-gray-500 text-sm">
                        选择目录
                    </button>
                </div>
            </div>
            <div>
                <label for="outputDir" class="block text-sm font-medium text-gray-700 mb-1">输出目录</label>
                <div class="mt-1 flex rounded-md shadow-sm">
                    <input type="text" id="outputDirPath" readonly class="flex-1 min-w-0 block w-full px-3 py-2 text-sm border border-gray-300 bg-gray-50" placeholder="选择输出目录">
                    <button id="outputDir" class="inline-flex items-center px-3 py-2 border border-l-0 bg-gray-50 text-gray-500 text-sm">
                        选择目录
                    </button>
                </div>
            </div>
            <button id="convertBtn" class="w-full bg-black hover:bg-gray-800 text-white font-medium py-2 px-4 rounded-md">开始转换</button>
        </div>
        <div id="result" class="mt-6 text-center text-gray-600"></div>
    </div>
</body>
4. 渲染进程交互
渲染进程负责处理用户的输入、转换按钮的点击事件,并显示转换的进度。
1
2
3
4
5
6
7
8
9
10
11
12
13
14
15
16
17
18
19
20
21
22
convertBtn.addEventListener('click', () => {
  if (!inputDir) {
    alert('请先选择输入目录!');
    return;
  }

  resultDiv.textContent = '转换中...';

  window.electronAPI.convertImages({ inputDir, outputDir });
});

window.electronAPI.onConversionProgress((event, { current, total }) => {
  resultDiv.textContent = `正在转换:${current}/${total}`;
});

window.electronAPI.onConversionComplete((event, message) => {
  resultDiv.textContent = message;
});

window.electronAPI.onConversionError((event, error) => {
  resultDiv.textContent = `错误:${error}`;
});
构建和打包
构建和打包方面,我使用 electron-builder 来支持多平台的构建。下面是 package.json 中的构建配置:
1
2
3
4
5
6
7
8
9
10
11
12
13
14
15
16
17
  "build": {
    "appId": "com.voxsay.webpconverter",
    "productName": "WebP Converter",
    "directories": {
      "output": "dist"
    },
    "win": {
      "target": "nsis"
    },
    "publish": [
      {
        "provider": "github",
        "owner": "harrisonwang",
        "repo": "webp-converter"
      }
    ]
  }
这段配置让我们可以将应用打包成 Windows、macOS 等多个版本,并发布到 GitHub 供用户下载使用。
使用方法
- 启动应用后,选择包含 JPG/PNG 图像的输入目录。
- 可选择指定输出目录(如果不指定,则默认输出到输入目录)。
- 点击“开始转换”按钮。
- 等待转换完成,界面会显示实时进度。
总结
通过 webp-converter 项目,我展示了如何使用 Cursor 快速构建跨平台桌面应用。Electron 提供了跨平台的支持,而 Sharp 库提供了图像转换的能力。如果你对 webp-converter 项目有兴趣,欢迎访问 GitHub 仓库并提出反馈或改进意见。