如何使用 Cloudflare Workers 自建 Docker 镜像代理
背景
近期,由于个别用户在 Docker Hub 上传了领导人的 AI 语音项目,导致中国区的 Docker 官方仓库被封锁。在这一事件的影响下,国内所有 Docker 镜像服务均被迫下架,涵盖了阿里云镜像服务、上海交通大学镜像服务等。此外,Docker Hub 的官方域名也遭到封锁。
此次 Docker Hub 的封锁给国内依赖 Docker 的开发和运维团队带来了重大挑战。首先,团队成员无法直接从 Docker Hub 拉取或推送镜像,这直接影响了软件的开发和部署效率。此外,依赖 Docker 镜像的自动化构建和持续集成/持续部署(CI/CD)流程也因此受到阻碍,增加了项目管理的复杂性和时间成本。团队不得不花费额外时间和资源寻找并配置国内的替代 Docker 镜像源或私有镜像仓库,这不仅增加了工作量,还可能带来额外的安全性和稳定性问题。
尽管面临种种挑战,但通过使用 Cloudflare Worker 自建镜像代理,我们能有效绕开这些访问限制,确保顺畅获取所需的 Docker 镜像。在接下来的内容中,我将详细介绍如何利用 Cloudflare Worker 自建镜像代理,为你的项目恢复正常的开发和部署流程,确保技术团队可以继续高效工作。
前提条件
在开始之前,你需要准备一个域名和一个 Cloudflare 账号。
操作步骤
Step 1: 创建 Worker
在 Cloudflare 创建一个 Worker,如命名为 docker,然后将以下代码粘贴到 Worker 中,并点击 部署:
1
2
3
4
5
6
7
8
9
10
11
12
13
14
15
16
17
18
19
20
21
22
23
24
25
26
27
28
29
30
31
32
33
34
35
36
37
38
39
40
41
42
43
44
45
46
47
48
49
50
51
52
53
54
55
56
57
58
59
60
61
62
63
64
65
66
67
68
69
70
71
72
73
74
75
76
77
78
79
80
81
82
83
84
85
86
87
88
89
90
91
92
93
94
95
96
97
98
99
100
101
102
103
104
105
106
107
108
109
110
111
112
113
114
115
116
117
118
119
120
121
122
123
124
125
126
127
128
129
130
131
132
133
134
135
136
137
138
139
140
141
142
143
144
145
146
147
148
149
150
151
152
153
154
155
156
157
158
159
160
161
162
163
164
165
166
167
168
169
170
171
172
173
174
175
176
177
178
179
180
181
182
183
184
185
186
187
188
189
190
191
192
193
194
195
196
197
198
199
200
201
202
203
204
205
206
207
208
209
210
211
212
213
214
215
216
217
218
219
220
221
222
223
224
225
226
227
228
229
230
231
232
233
234
235
236
237
238
239
240
241
242
243
244
245
246
247
248
249
250
251
252
253
254
255
256
257
258
259
260
261
262
263
264
265
266
267
268
269
270
271
272
273
274
275
276
277
278
addEventListener("fetch", (event) => {
event.passThroughOnException();
event.respondWith(handleRequest(event.request));
});
const dockerHub = "https://registry-1.docker.io";
const HTML = `
<!DOCTYPE html>
<html lang="zh-CN">
<head>
<meta charset="utf-8">
<meta name="viewport" content="width=device-width, initial-scale=1">
<link rel="shortcut icon" href="https://voxsay.com/assets/img/favicons/favicon.ico">
<title>Docker 镜像代理使用说明</title>
<style>
body {
font-family: 'Roboto', sans-serif;
margin: 0;
padding: 0;
background-color: #f4f4f4;
}
.header {
background: linear-gradient(135deg, #667eea, #764ba2);
color: #fff;
padding: 20px 0;
text-align: center;
box-shadow: 0 2px 4px rgba(0, 0, 0, 0.1);
}
.container {
max-width: 800px;
margin: 40px auto;
padding: 20px;
background-color: #fff;
box-shadow: 0 4px 8px rgba(0, 0, 0, 0.1);
border-radius: 10px;
}
.content {
margin-bottom: 20px;
}
.footer {
text-align: center;
padding: 20px 0;
background-color: #333;
color: #fff;
}
pre {
background-color: #272822;
color: #f8f8f2;
padding: 15px;
border-radius: 5px;
overflow-x: auto;
}
code {
font-family: 'Source Code Pro', monospace;
}
a {
font-weight: bold;
color: #ffffff;
text-decoration: none;
}
a:hover {
text-decoration: underline;
}
@media (max-width: 600px) {
.container {
margin: 20px;
padding: 15px;
}
.header {
padding: 15px 0;
}
}
</style>
<link href="https://fonts.googleapis.com/css2?family=Roboto:wght@400;700&family=Source+Code+Pro:wght@400;700&display=swap" rel="stylesheet">
</head>
<body>
<div class="header">
<h1>Docker 镜像代理使用说明</h1>
</div>
<div class="container">
<div class="content">
<h3>带镜像仓库地址使用说明</h3>
<p>1.拉取镜像</p>
<pre><code># 拉取 redis 官方镜像(不带命名空间)
docker pull {:host}/redis
# 拉取 rabbitmq 官方镜像
docker pull {:host}/library/rabbitmq
# 拉取 postgresql 非官方镜像
docker pull {:host}/bitnami/postgresql</code></pre><p>2.重命名镜像</p>
<pre><code># 重命名 redis 镜像
docker tag {:host}/library/redis redis
# 重命名 postgresql 镜像
docker tag {:host}/bitnami/postgresql bitnami/postgresql</code></pre><h3>镜像源方式使用说明</h3><p>1.添加镜像源</p>
<pre><code># 添加镜像代理到 Docker 镜像源
sudo tee /etc/docker/daemon.json << EOF
{
"registry-mirrors": ["https://{:host}"]
}
EOF</code></pre><p>2.拉取镜像</p>
<pre><code># 拉取 redis 官方镜像
docker pull redis
# 拉取 rabbitmq 非官方镜像
docker pull bitnami/rabbitmq
# 拉取 postgresql 官方镜像
docker pull postgresql</code></pre>
</div>
</div>
<div class="footer">
<p>©2024 <a href="https://voxsay.com">voxsay.com</a>. All rights reserved. Powered by <a href="https://cloudflare.com">Cloudflare</a>.</p>
</div>
</body>
</html>
`
const routes = {
// 替换为你的域名
"dp.410006.xyz": dockerHub,
};
function routeByHosts(host) {
if (host in routes) {
return routes[host];
}
return "";
}
async function handleRequest(request) {
const url = new URL(request.url);
if (url.pathname == "/") {
return handleHomeRequest(url.host);
}
const upstream = routeByHosts(url.hostname);
if (!upstream) {
return createNotFoundResponse(routes);
}
const isDockerHub = upstream == dockerHub;
const authorization = request.headers.get("Authorization");
if (url.pathname == "/v2/") {
return handleFirstRequest(upstream, authorization, url.hostname);
}
// get token
if (url.pathname == "/v2/auth") {
return handleAuthRequest(upstream, url, isDockerHub, authorization);
}
// redirect for DockerHub library images
// Example: /v2/busybox/manifests/latest => /v2/library/busybox/manifests/latest
if (isDockerHub) {
const pathParts = url.pathname.split("/");
if (pathParts.length == 5) {
pathParts.splice(2, 0, "library");
const redirectUrl = new URL(url);
redirectUrl.pathname = pathParts.join("/");
return Response.redirect(redirectUrl.toString(), 301);
}
}
return handlePullRequest(upstream, request);
}
function parseAuthenticate(authenticateStr) {
// sample: Bearer realm="https://auth.ipv6.docker.com/token",service="registry.docker.io"
// match strings after =" and before "
const re = /(?<=\=")(?:\\.|[^"\\])*(?=")/g;
const matches = authenticateStr.match(re);
if (matches == null || matches.length < 2) {
throw new Error(`invalid Www-Authenticate Header: ${authenticateStr}`);
}
return {
realm: matches[0],
service: matches[1],
};
}
async function fetchToken(wwwAuthenticate, scope, authorization) {
const url = new URL(wwwAuthenticate.realm);
if (wwwAuthenticate.service.length) {
url.searchParams.set("service", wwwAuthenticate.service);
}
if (scope) {
url.searchParams.set("scope", scope);
}
const headers = new Headers();
if (authorization) {
headers.set("Authorization", authorization);
}
return await fetch(url, { method: "GET", headers: headers });
}
function handleHomeRequest(host) {
return new Response(HTML.replace(/{:host}/g, host), {
status: 200,
headers: {
"content-type": "text/html",
}
})
}
async function handlePullRequest(upstream, request) {
const url = new URL(request.url);
const newUrl = new URL(upstream + url.pathname);
const newReq = new Request(newUrl, {
method: request.method,
headers: request.headers,
redirect: "follow",
});
return await fetch(newReq);
}
async function handleFirstRequest(upstream, authorization, hostname) {
const newUrl = new URL(upstream + "/v2/");
const headers = new Headers();
if (authorization) {
headers.set("Authorization", authorization);
}
// check if need to authenticate
const resp = await fetch(newUrl.toString(), {
method: "GET",
headers: headers,
redirect: "follow",
});
if (resp.status === 401) {
headers.set(
"Www-Authenticate",
`Bearer realm="https://${hostname}/v2/auth",service="cloudflare-docker-proxy"`
);
return new Response(JSON.stringify({ message: "Unauthorized" }), {
status: 401,
headers: headers,
});
} else {
return resp;
}
}
async function handleAuthRequest(upstream, url, isDockerHub, authorization) {
const newUrl = new URL(upstream + "/v2/");
const resp = await fetch(newUrl.toString(), {
method: "GET",
redirect: "follow",
});
if (resp.status !== 401) {
return resp;
}
const authenticateStr = resp.headers.get("WWW-Authenticate");
if (authenticateStr === null) {
return resp;
}
const wwwAuthenticate = parseAuthenticate(authenticateStr);
let scope = url.searchParams.get("scope");
// autocomplete repo part into scope for DockerHub library images
// Example: repository:busybox:pull => repository:library/busybox:pull
if (scope && isDockerHub) {
let scopeParts = scope.split(":");
if (scopeParts.length == 3 && !scopeParts[1].includes("/")) {
scopeParts[1] = "library/" + scopeParts[1];
scope = scopeParts.join(":");
}
}
return await fetchToken(wwwAuthenticate, scope, authorization);
}
const createNotFoundResponse = (routes) => new Response(
JSON.stringify({ routes }),
{
status: 404,
headers: {
"Content-Type": "application/json",
},
}
);
请将脚本中的
dp.410006.xyz替换为你的域名。
Step 2: 绑定域名
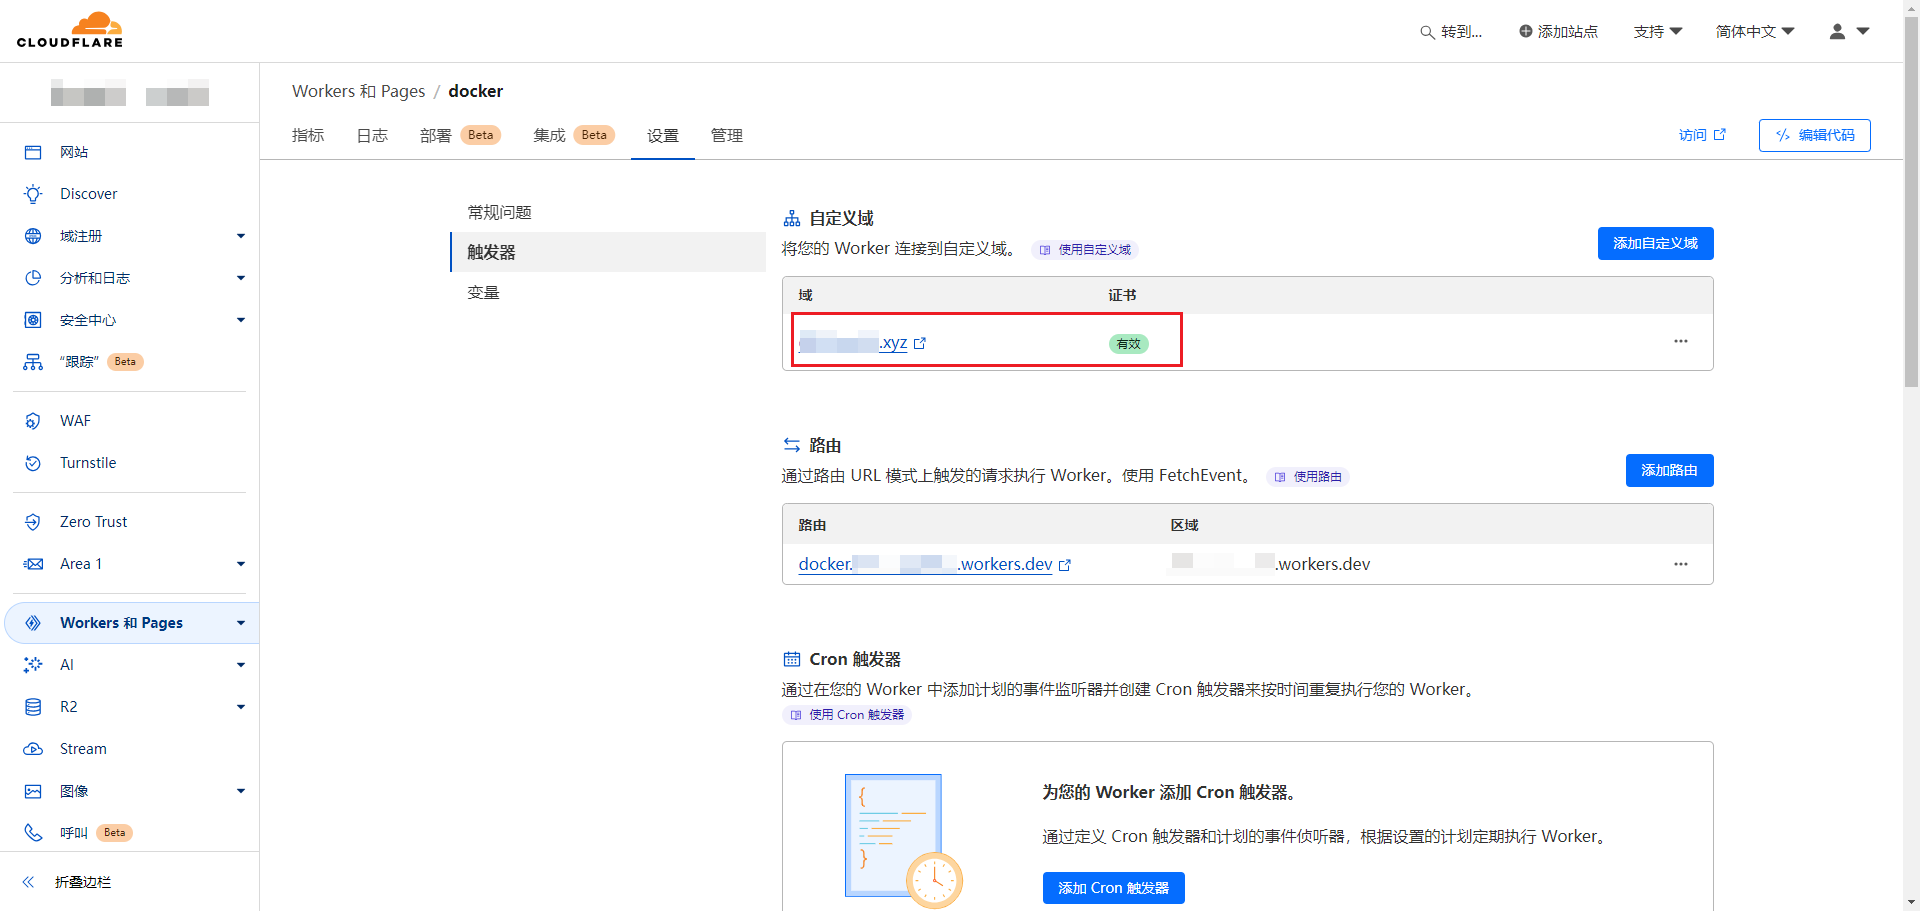
点击 docker 进入 Worker 页面,点击 设置 > 触发器 > 添加自定义域,输入你要绑定的域名,等待创建完成,如下图所示:
Step 3: 访问镜像代理首页
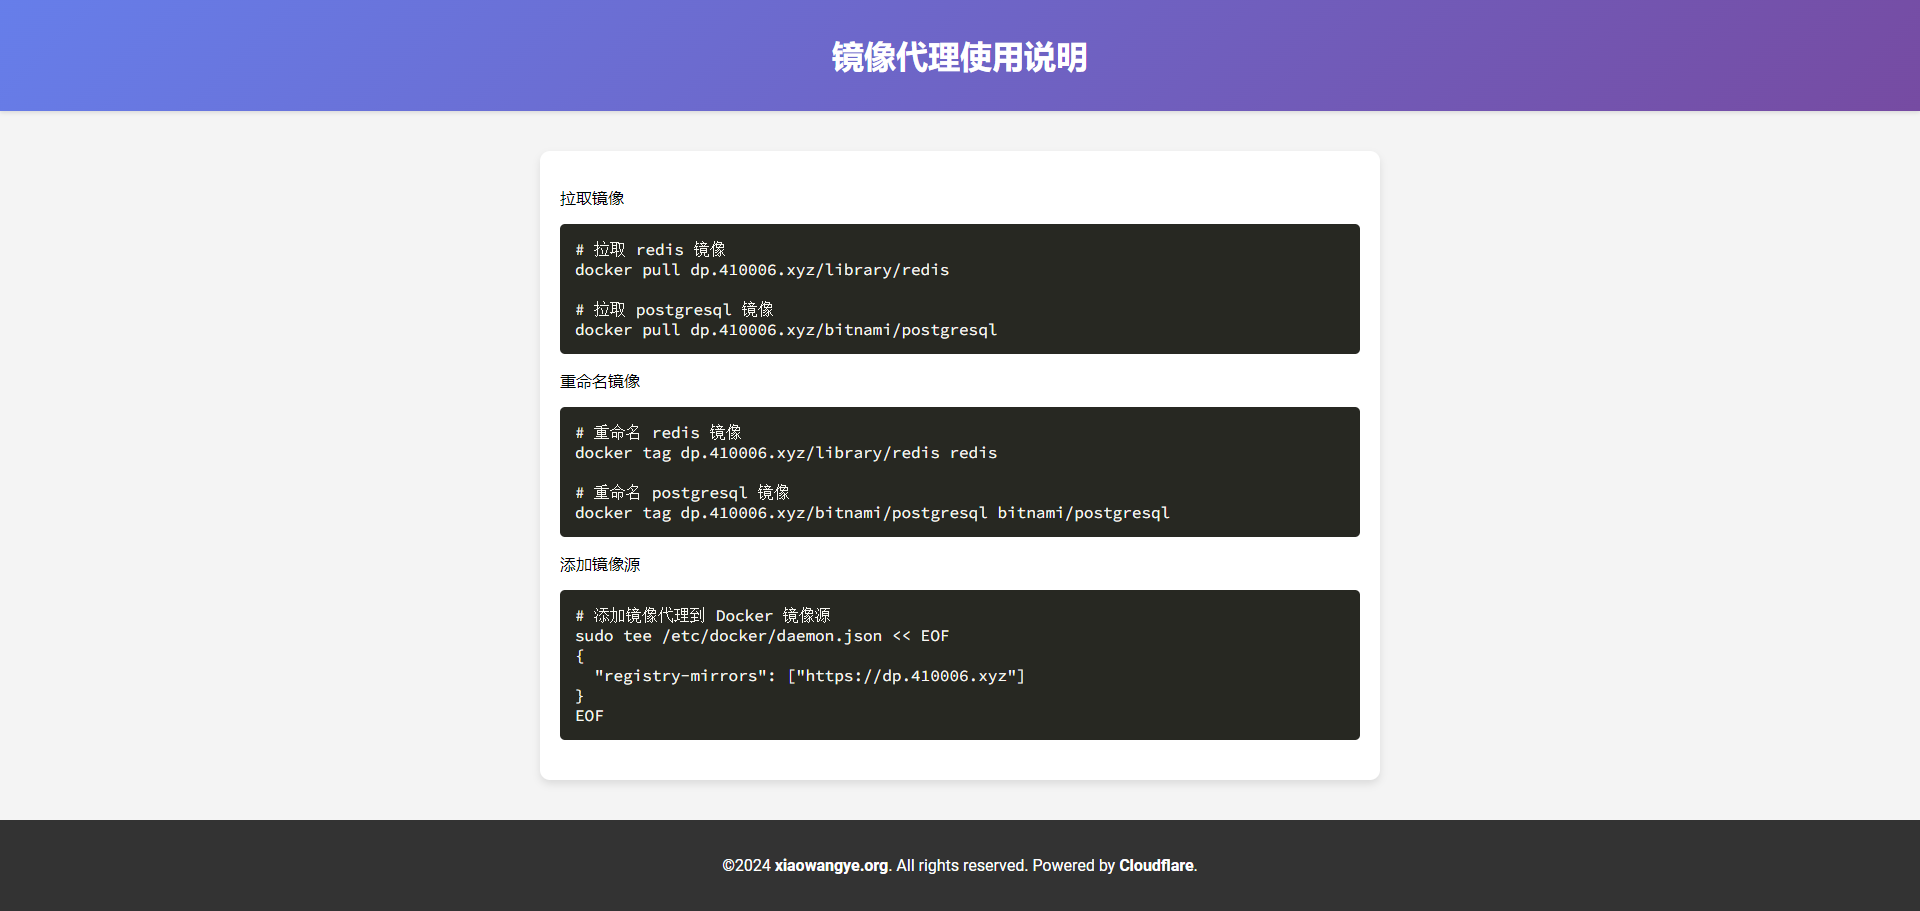
访问域名 dp.410006.xyz,可查看镜像代理的使用说明:
总结
在这篇文章中,我介绍了如何使用 Cloudflare Workers 创建一个名为 docker 的 Worker,并将其绑定到自定义域名。通过完成这些步骤,你可以使用自定义域名作为 Docker 镜像代理,最终绕过网络限制,成功拉取 Docker 镜像。

